

The truth about my vinyl-wrapped worktop
Pros, cons and DIY step-by-step

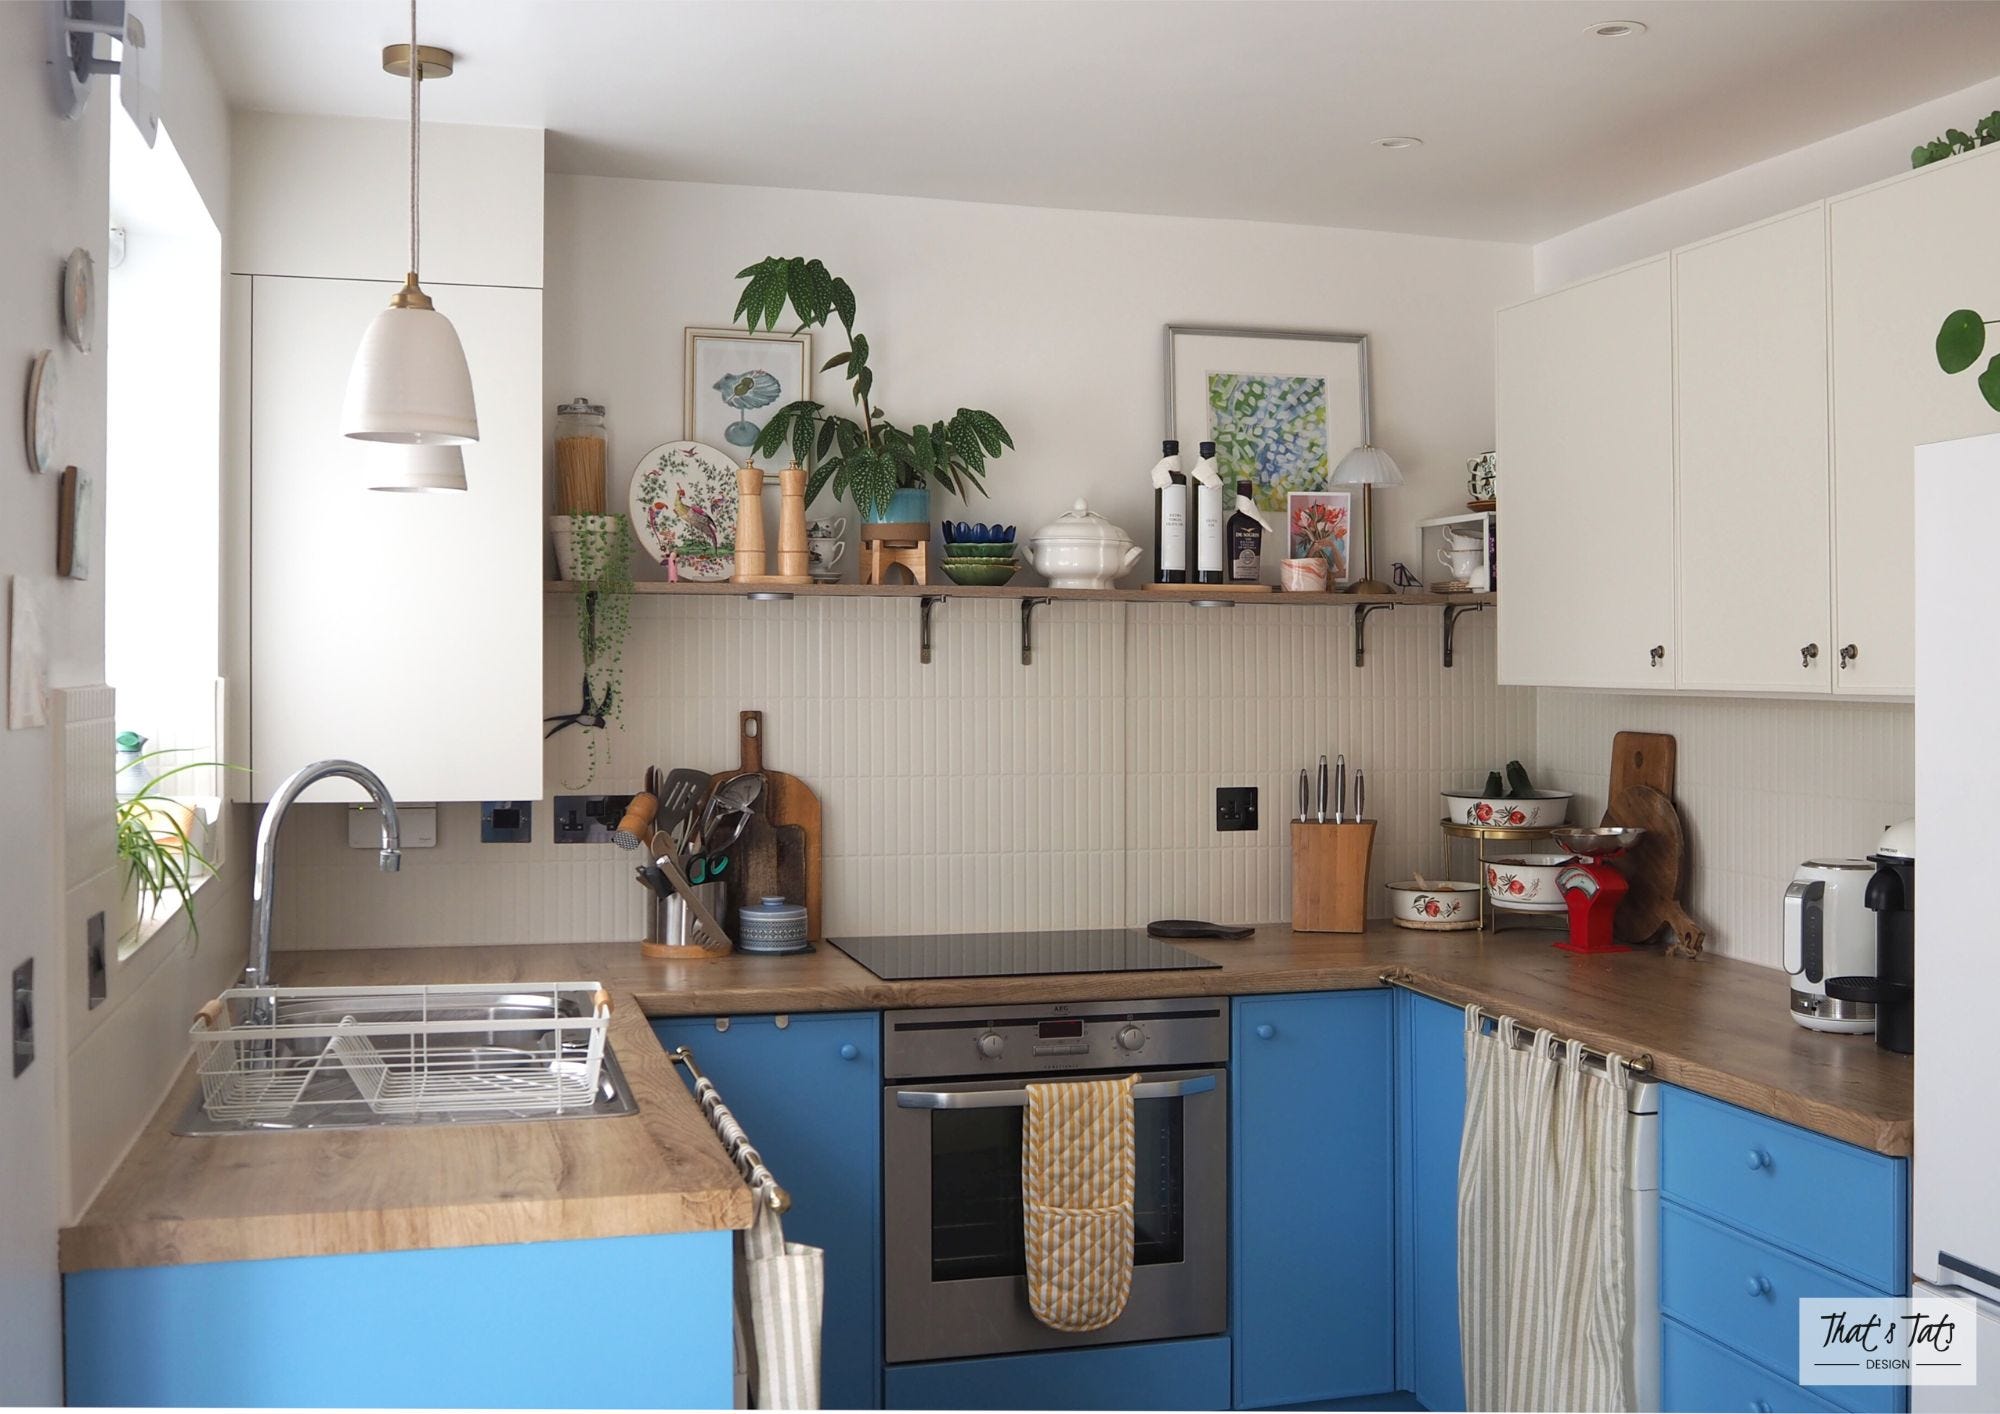
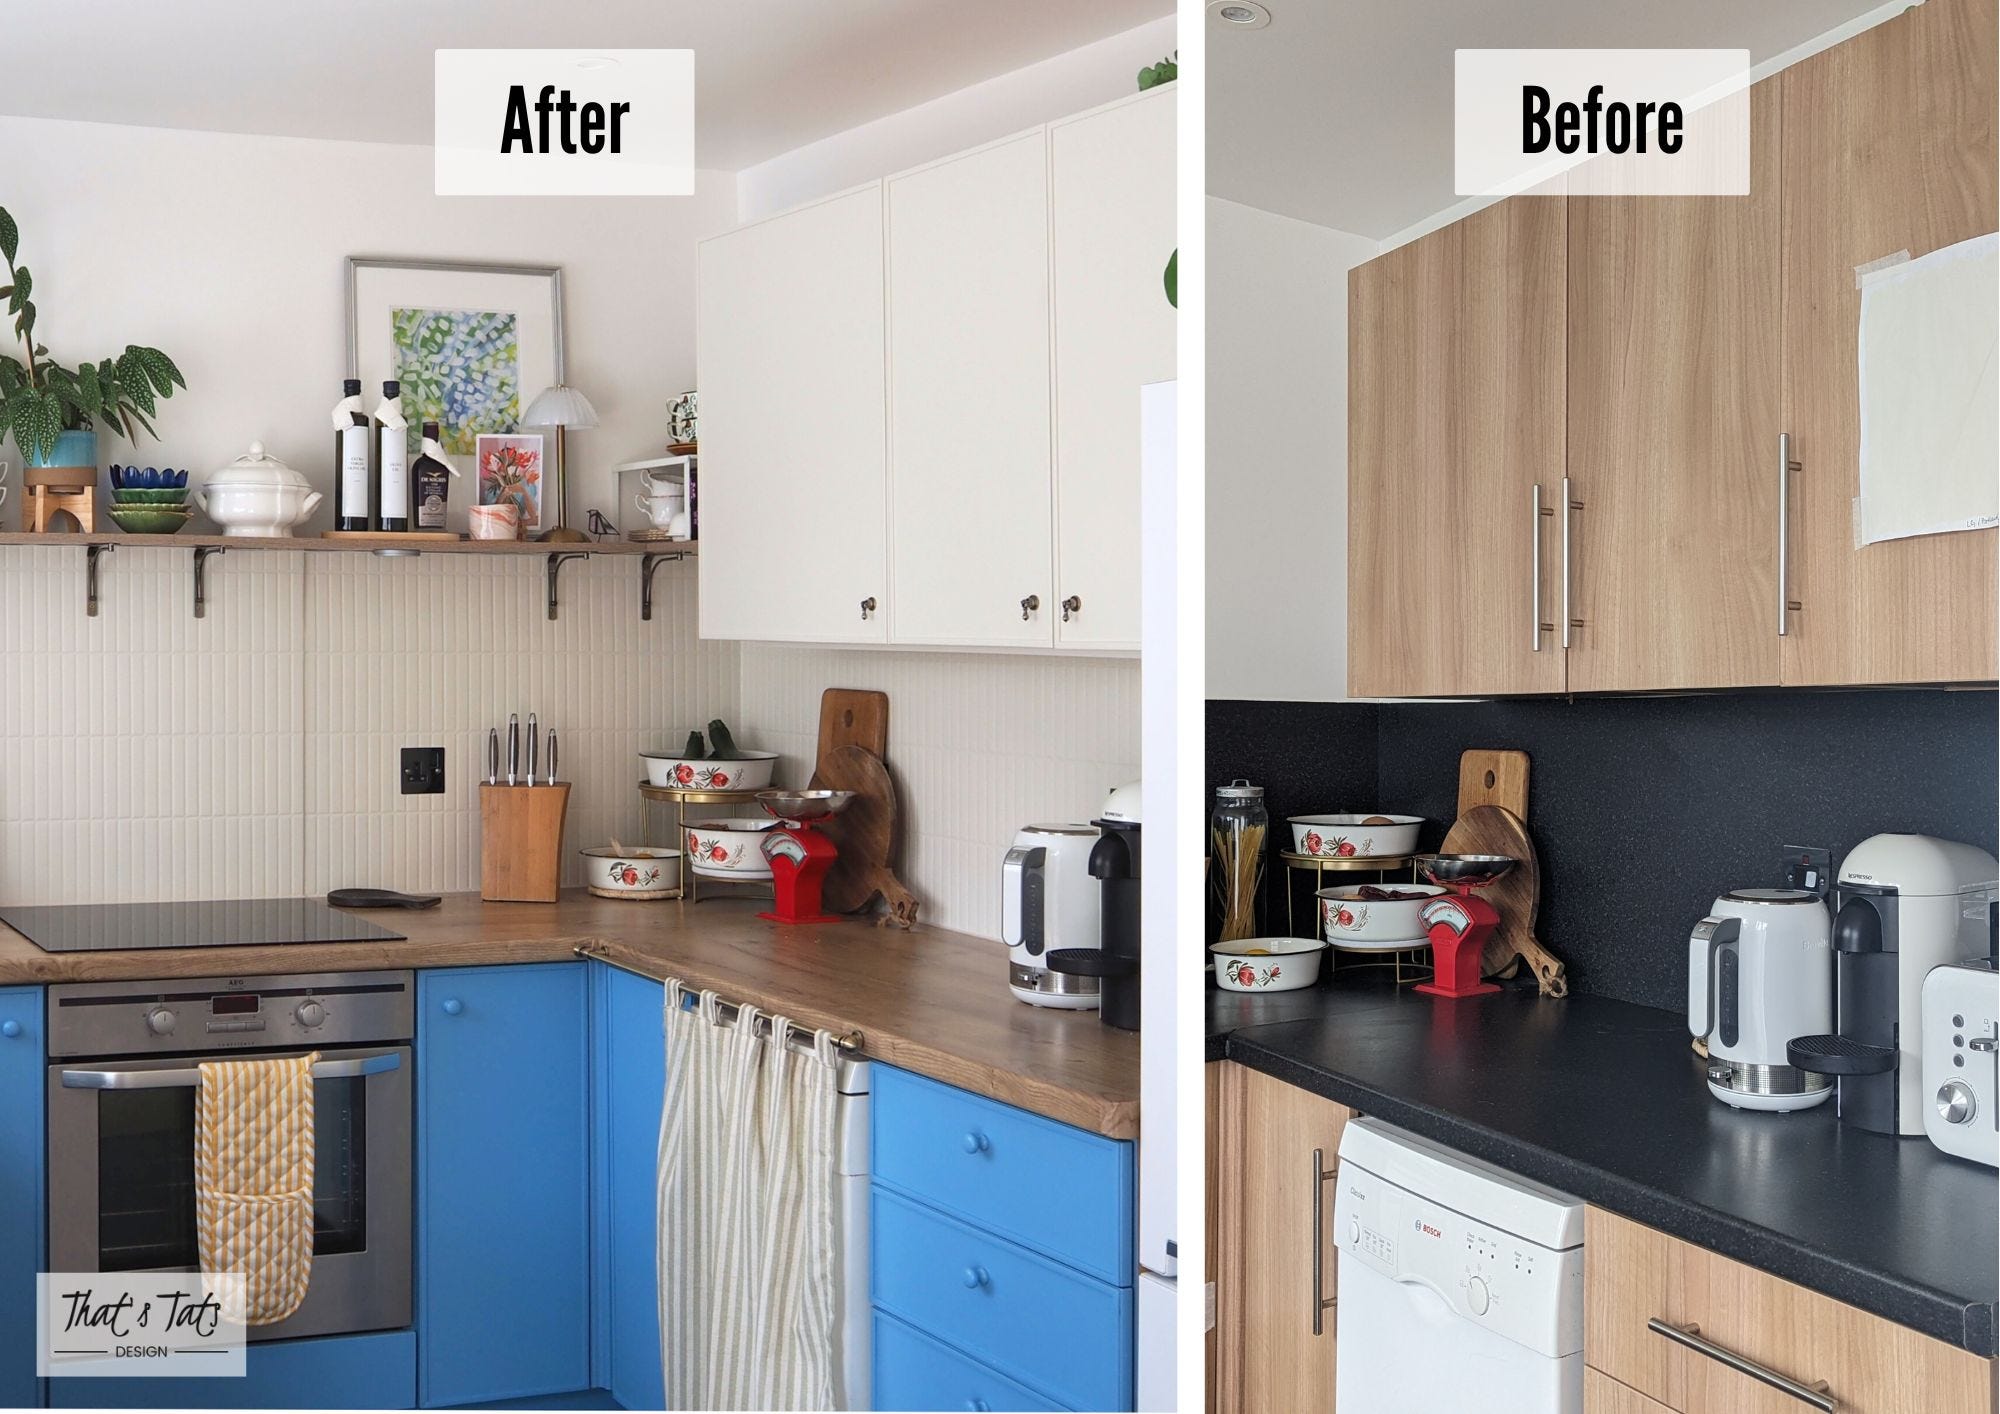
It’s been just over 6 months since I revealed my kitchen makeover and if you remember, when planning the project, I’ve been unsure about a couple of the changes I was making. I was the most sceptical of the splashback upcycle where I decided to use tile stickers, which was closely followed by wrapping the worktops in vinyl film, saying…
“I was [...] always quite curious to see what it would be like to upcycle worktops with vinyl film. I wanted to try this for a long time and make my mind up if this is indeed the viable long term solution it is made out to be.”

I am no stranger to using vinyl film on hard working surfaces, as I upcycled my dining table using some gorgeous marble effect vinyl film a few years ago. The table has withstood the test of time, and against expectations the vinyl has actually kept up far better than the paint I used on the frame. However, kitchen worktops are a completely different surface and need to be uber-hard-wearing. They need to withstand consistent daily use where various items are dragged and shoved over the surface, hot pans are handled, and liquids are spilled. Then there’s the constant danger of staining from various ingredients. A dining table in comparison has usually a much less challenging life, depending on what you use it for of course.
Now, when writing up the kitchen reveal, I did promise to review how this solution is holding up in my kitchen, and provide some guidance on how to wrap a worktop in vinyl, if this is an option you consider. So here we are…
Step-by-step guide: How to wrap a worktop in vinyl film
Planning
Before getting started, it’s important to order the correct amount of vinyl film. Worktops in the UK are in most cases a standard width of 60 to 65 cm. However, when measuring the width of the vinyl needed, do remember to account for the vinyl wrapping around and under the front of the worktop. My worktops for instance are 60cm wide, and I needed to add another ~7.5 cm to allow for wrapping around the worktop front. Luckily vinyl film also comes in standard widths generally, one being 675mm, exactly the amount I required without needing to cut the width to size.
When measuring the length required, it is worth allowing for wrapping around and under the end-panels of the worktop. Additionally, for an L or U shared worktop, adding another few centimetres to the length to achieve the perfect seam, would be a good idea.
Sourcing
Vinyl films can be purchased from various highstreet retailers as well as online. There’s the commonly known brand d-c-fix, which can be purchased at B&Q, Wilko, eBay, Vinyl Depot, Vinyl Warehouse, etc. I usually shop around for the best price at the time. If you are looking for something a bit different however, there is a ticker vinyl alternative available from Cover Styl. I have personally not tried their products or services yet, but having been a commercial supplier for years, they started offering products and installation for domestic use fairly recently. I’ve seen them used by a couple of DIYers I trust, such as Melanie Lissack and Michaela Schoebridge.
The tools
Once the vinyl arrived and I was ready to go, I found the following additional materials useful to have to hand:
Cleaning products and cloth to thoroughly prepare the surfaces
Measuring tape for those final precise measurements
Ruler to allow for straight cuts
Stanley knife to achieve sharp precise cuts
Heat gun or hair dryer, where the latter was more than sufficient in my experience
Squeegee or credit card for smoothing, but I have to admit I rather quickly stopped using them, as the items felt far too small compared to the worktop surface and I felt I had much more control simply using my hands. However, that may not work for everyone.
The process
Step 1: Prepare and clean the surface
Before getting started, check your worktop surface for any imperfections, as these will show through the vinyl. My worktop for instance had developed quite big gaps and was uneven where the separate worktop pieces joined. So I filled and sanded the gaps smooth before starting to apply the vinyl.
As a final step in preparing the surface, ensure to remove any dirt and oils by thoroughly cleaning the worktop using a cleaner that allows cutting through grease, such as Elbow Grease for instance. Let the surface dry completely before starting to apply the vinyl.
Step 2: Apply the vinyl film
Depending on the length of vinyl purchased, cut it to size roughly, so it’s more comfortable to work with. You will be able to trim the vinyl to the exact position once it’s applied.
Starting at one end of the worktop, slowly peel the backing off the vinyl and start applying it to the surface. This is where you can use your smoothing tool or hands to smooth the vinyl as you lay it down, working out any air bubbles. Remember to take your time and peel the backing off gradually, rather than all in one go, as you continue to apply the film along the surface. You want to be careful to not pull, and hence stretch, the vinyl too much to avoid shrinking as much as possible once it’s applied.
I was able to apply the vinyl by myself, but it would have definitely been easier to have an extra set of hands to help hold the roll of vinyl when working around the hob and sink, or assist the simultaneous motions of pulling off the backing, smoothing the vinyl, all the while ensuring it is applied as straight as possible.
Step 3: Finish the edges and seams
This is where the heat comes in, as vinyl is more pliable when warmed up, which is particularly helpful when needing to smooth out certain tricky parts or wrap it around edges. Apply the heat with the hair dryer or heat gun carefully, and being careful while it’s hot, press down the vinyl firmly. Take care to not stretch the vinyl too much to avoid excessive shrinking once it’s cooled down, or pulling it out of shape.
If, like me, you have an L or U shaped surface to cover, I achieved the perfect seam where the separate worktop pieces meet by overlapping the vinyl pieces slightly and cutting along both layers simultaneously. I then peeled off the excess top layer, before carefully lifting the vinyl to remove the excess bottom layer, and firmly pressing both remaining vinyl pieces together at the seam. I had to work fairly quickly, because the longer the vinyl stuck together, the harder it would have been to separate it.
Step 4: Trim the excess and allow for proper adhesion
Once you’re happy with the placement, trim any excess vinyl with a sharp knife. It may be worth mentioning, for simplicity of describing the process, this is set out as a separate step, but I did find it more helpful to trim the vinyl as I went along.
What is certainly important to remember as a last step, is to allow the adhesive to bond fully for around 24 hours after application. So don’t leave hot cups of tea on the surface, and avoid any heavy use of the worktop during this time.
The verdict - Is it worth wrapping your worktop in vinyl?
Six months after applying vinyl film to my worktop, as intended, I have learned a lot. So here’s the advantages and disadvantages to consider should you be toying with the idea of wrapping your kitchen surface in vinyl film.
Pros
Cost-effective solution – Vinyl warp is a fraction of the cost of replacing a worktop and a big reason why I wanted to try this solution. I had nothing to lose really.
Easy installation – Having applied it before, I knew it would be a straightforward DIY project without the need for professional tools or expert knowledge. There was also no mess or upheaval compared to installing a new worktop.
Easy to clean – Same as before, the worktops stayed waterproof and dirt is very simple to wipe down. I do need to take care when scrubbing stubborn stains though, as this will damage the surface.
Variety of designs – The choice is almost endless and there’s something for every space: marble, wood, concrete, solid colour finishes, etc. The only downside is the lack of texture, really.
Cons
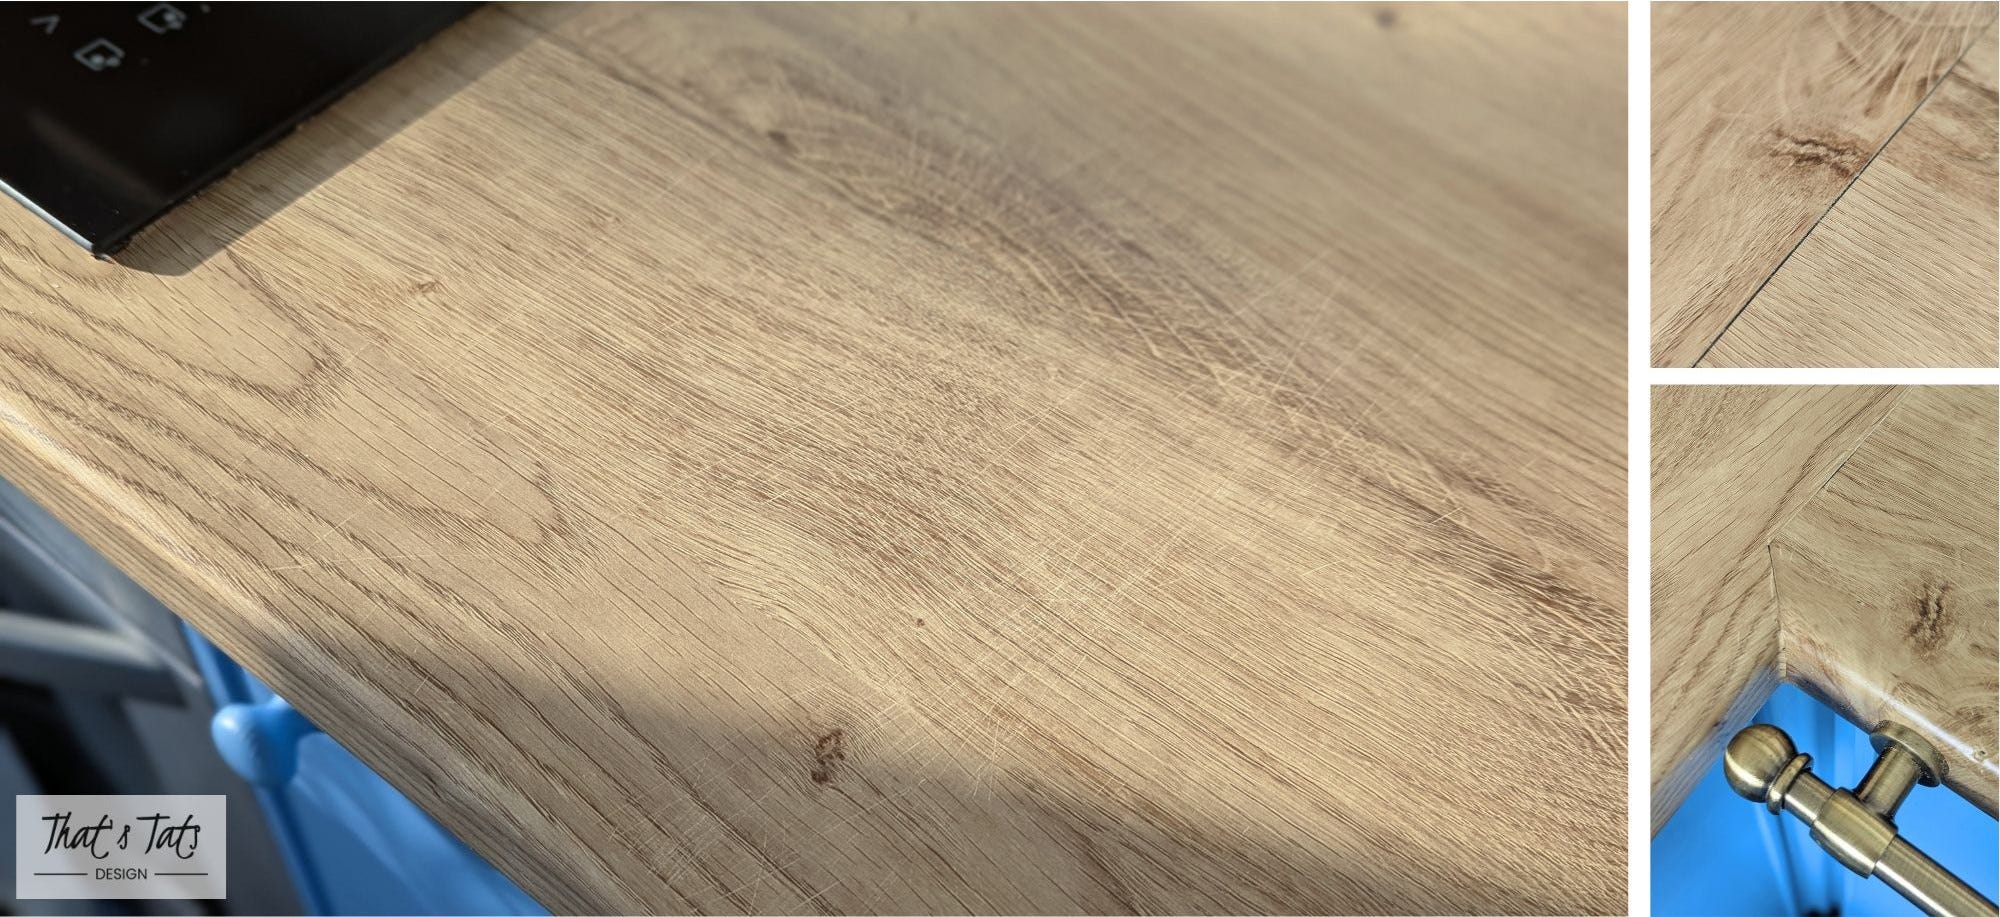
Not very durable – I experienced only some minor peeling and luckily only in well hidden places, such as behind the hob. The scratches however are something to be aware of. It did not take long for them to appear. This may possibly be avoided by sealing the surface with food-safe varnish however.
Heat sensitive – Taking a hot tray out of the oven when cooking for the first time after applying the vinyl, I accidentally bumped it against the front of the worktop, which instantly melted the vinyl and left a little mark. I would also never place hot pans directly onto the vinyl wrapped surface for this reason, but to be honest that’s not something I’d ever done anyway on any worktop.
Movement over time - I was so proud of the seamless application I achieved, especially where the separate worktop pieces joined, but now, 6 months later, this is no more. Though I was very careful to not stretch the vinyl on application, there is still some visible shrinking, revealing the surface underneath.
So after this relatively short time, my overall verdict would be that I would certainly consider this solution again on a less used surface than a kitchen worktop. After all, vinyl worked very well on my dining table, and I may consider trying the thicker variety on a utility room worktop. When choosing a vinyl design, I would definitely recommend going for something with a busy pattern rather than a solid colour, as this will disguise any imperfections and scratches for a while longer. Lastly, vinyl wrap is an absolutely cost effective, quick, and easy option for a short term upcycle, while saving up for the more durable new worktop for instance. However, I’d always champion considering the environmental impact here first, as vinyl is made of plastic after all. Other cost-effective, and more long lasting upcycle options to consider would be resurfacing kits, painting, or using laminate overlays. I’ve not tried any of these solutions yet, but am intrigued to give one of them a go next time.
As always, I hope you found this article useful and that it may help with a future project. Let me know! Equally, if you also tried vinyl wrapping your kitchen worktop, I’d love to know what your experience has been. I read, respond to, and hugely appreciate every comment, like, and share/restack. I absolutely love chatting to you, and not only does your feedback on any of my articles make my day, it also helps me make future articles even more helpful. As a bonus, you make an enormous difference to the articles being read by as many people as possible. So I highly appreciate you being here and look forward to chatting in the comments or via private message.

You may also be interested in
Simple kitchen organisation ideas

If you’ve been here a while, you will know kitchens and bathrooms are my absolute favourite rooms to make over. They both provide a unique challenge when it comes to organisation and making a space work. In the average UK home these are usually relatively compact rooms, so they need to work extra hard. Quite often, kitchens especially are also inherited…
DIY Terrazzo Splashback

Tiles are certainly the go-to when it comes to choosing a splashback and for very good reason. They are durable, they can withstand heat, they are easy to keep clean, well, most types are - hello encaustic beauties, why do you just have to always come unsealed? But then, tiles can also be expensive, and there is grout. The latter meaning, whatever patte…
House to home without renovating

It is very rare that a new house, whether rented or owned, is feeling like your home when first moving in. There is a small chance that you may get lucky and find a home that already has your style, the wall colours are exactly what you like, the floors are what you would have chosen, and so on. I have not yet come across this home. But then it is also …