


Shelf Styling How-To: Bring New Energy into Your Home
My tips and tricks how to achieve relaxed and lived-in looking shelves

Spring, what a fantastic season! Seeing nature wake up and the sun getting warmer and making an appearance more often, makes me naturally also feel full of new life and energy. So over the last few weeks, I kicked off my exercise routine again, lightly refreshed my wardrobe, updated my skin care routine, and even started to get up before dawn to watch the sunrise. I recommend doing all those things, which resulted in quite a mindset shift and helped me get out of that winter slump I was in, but I do especially recommend to simply go and see at least one sunrise this spring. I don’t know what magic this little moment of watching the sun peek out over the horizon sprinkled all over me, but it was transformative. Watching one of the fundamental elements of life rise slowly, in such calm and quiet, and wake up the rest of nature with its gorgeous warm light, bringing with it a new day full of opportunity, I felt reinvigorated and that I could achieve anything.
Having spent some time renewing myself, my mind is now naturally shifting to refreshing the space around me, my home. Looking around the living room for instance, it is time to pack winter away and let that fresh spring feeling in. Doing that includes some restyling of my beloved IVAR shelves and this is where today’s article comes in. A long time ago, I shared my styling approach on Instagram, and the feedback was so positive that I promised to write it all down to be referred to later. So here we are…
I’d like to start by highlighting that by now you may have come to know that home to me is not the perfectly styled and constantly tidy space you see in interior magazines or TV shows. Life is simply not like that, so it’s rather a random collection of memories, things we love, that may not always perfectly fit together, but make up the story of our lives and are really a display of our unique personalities. Comfort is very important over here, so when I say restyling it doesn’t have to mean a big clear-out or a full redecoration, except if that’s what you’re after of course. But generally, when I’d like to refresh a space, I most often just rearrange things and may add something fresh here and there. This something fresh most often comes from shopping my home, my tiny loft in this case usually, and sometimes by adding a newly acquired item I spotted while out and about. So restyling for me is basically, a kind of gentle and satisfying re-shuffle that makes a room feel new and just right again.
My styling basics
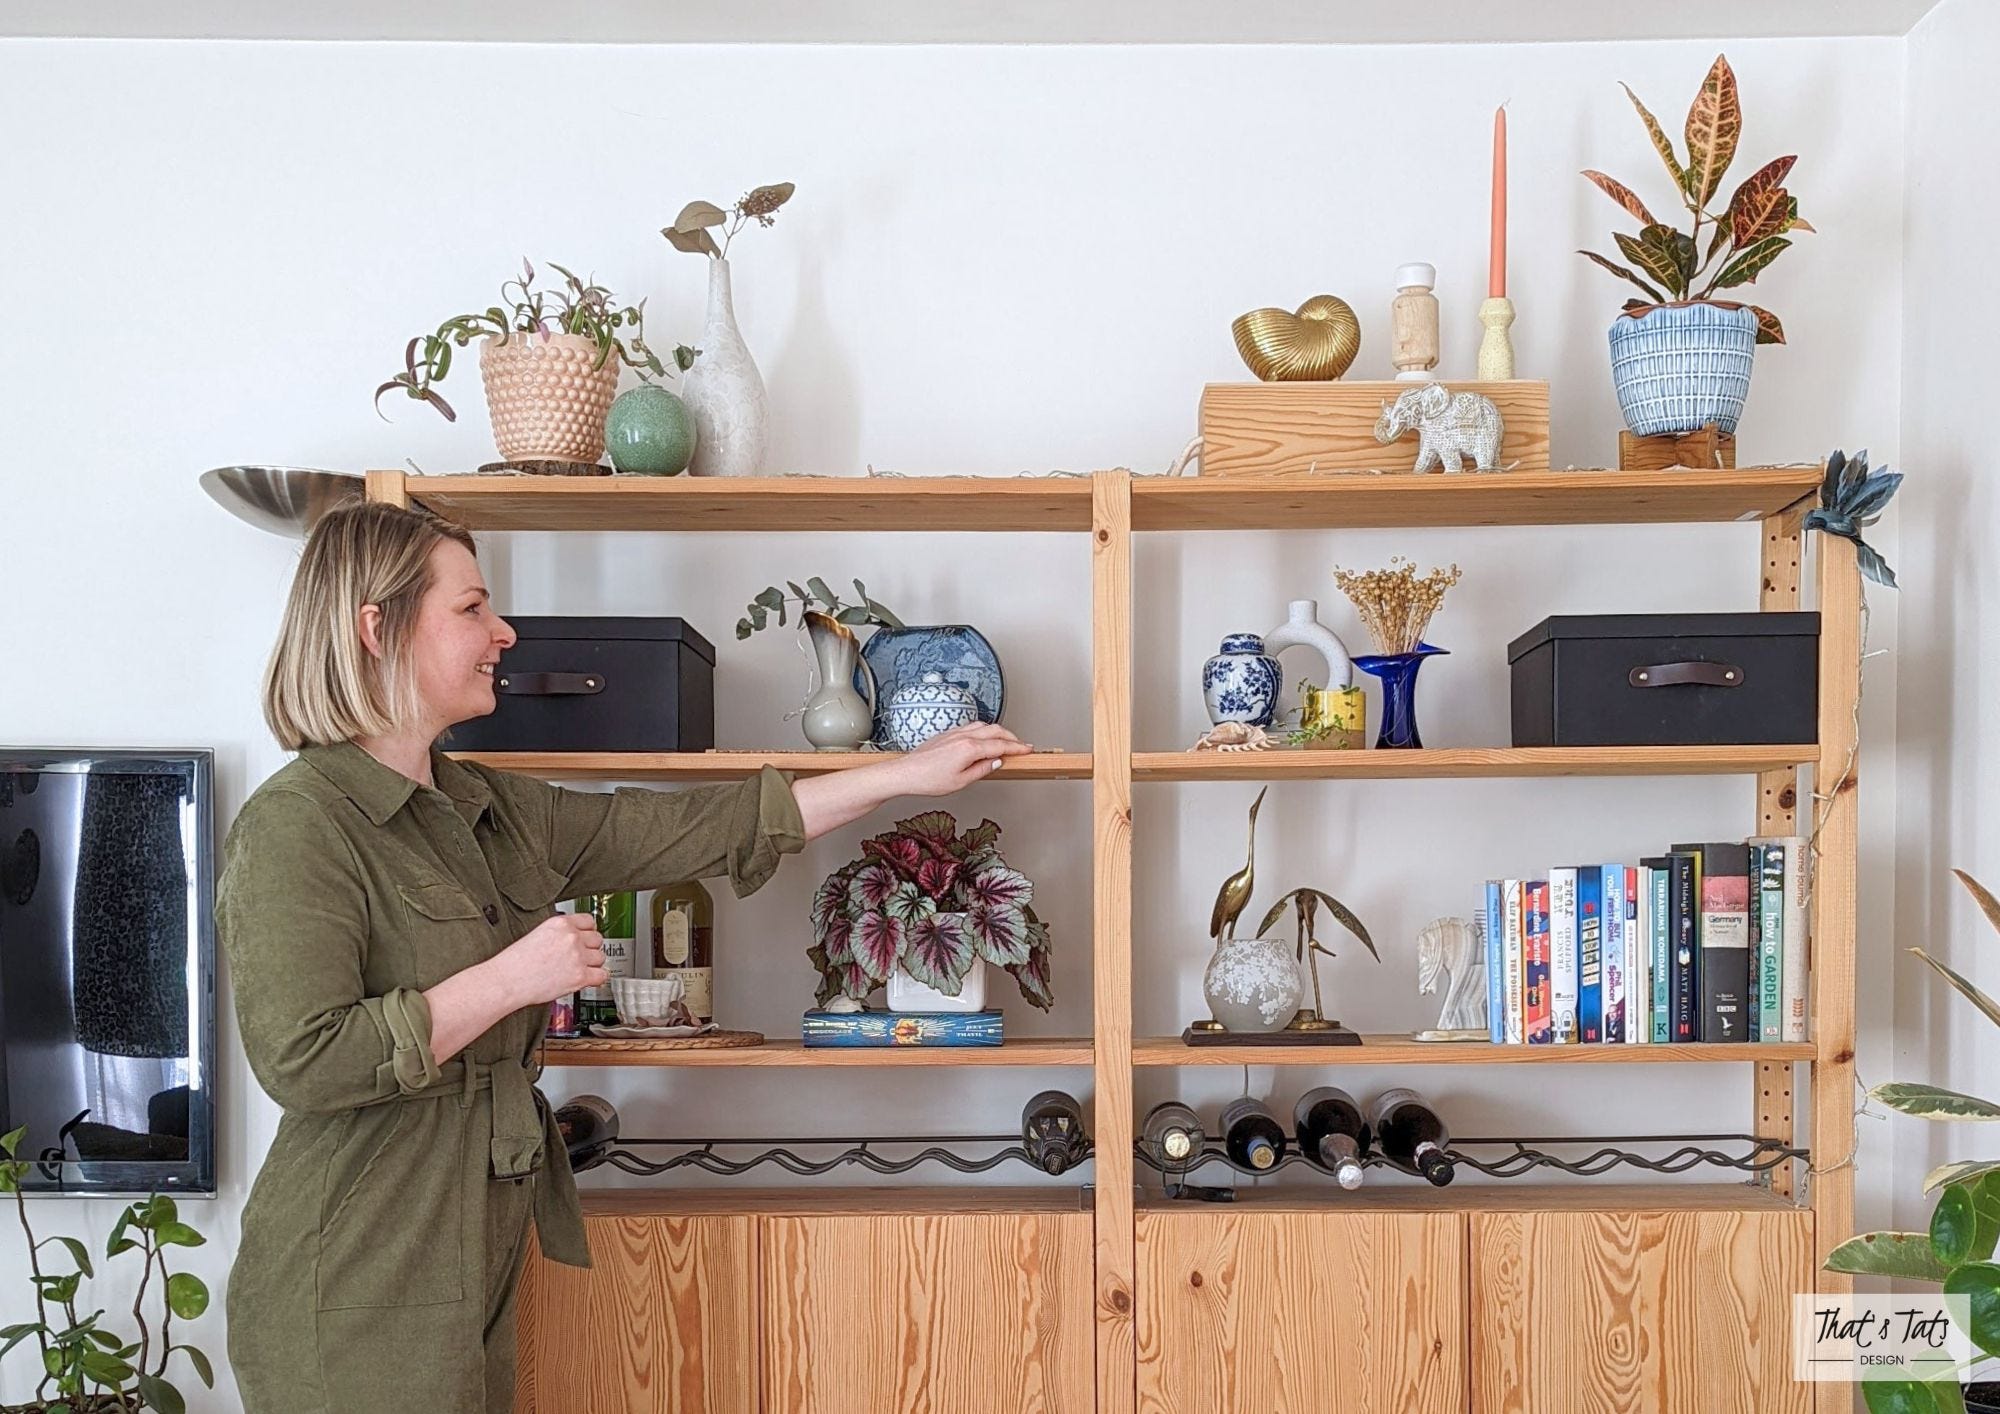
Room or shelf styling is always quite an organic process for me. I never approach it with a plan, as it really depends on the items I feel like displaying in the moment and how they work together. I move things around quite a lot until I find a combination that feels right to me. With time I realised however, that I am applying a certain approach to my creative process, and this is what I’d love to share with you today, taking the styling of my IVAR shelves in my previous home as an example. Just in case you were wondering if I’d moved again or secretly redecorated, I haven’t.
The base
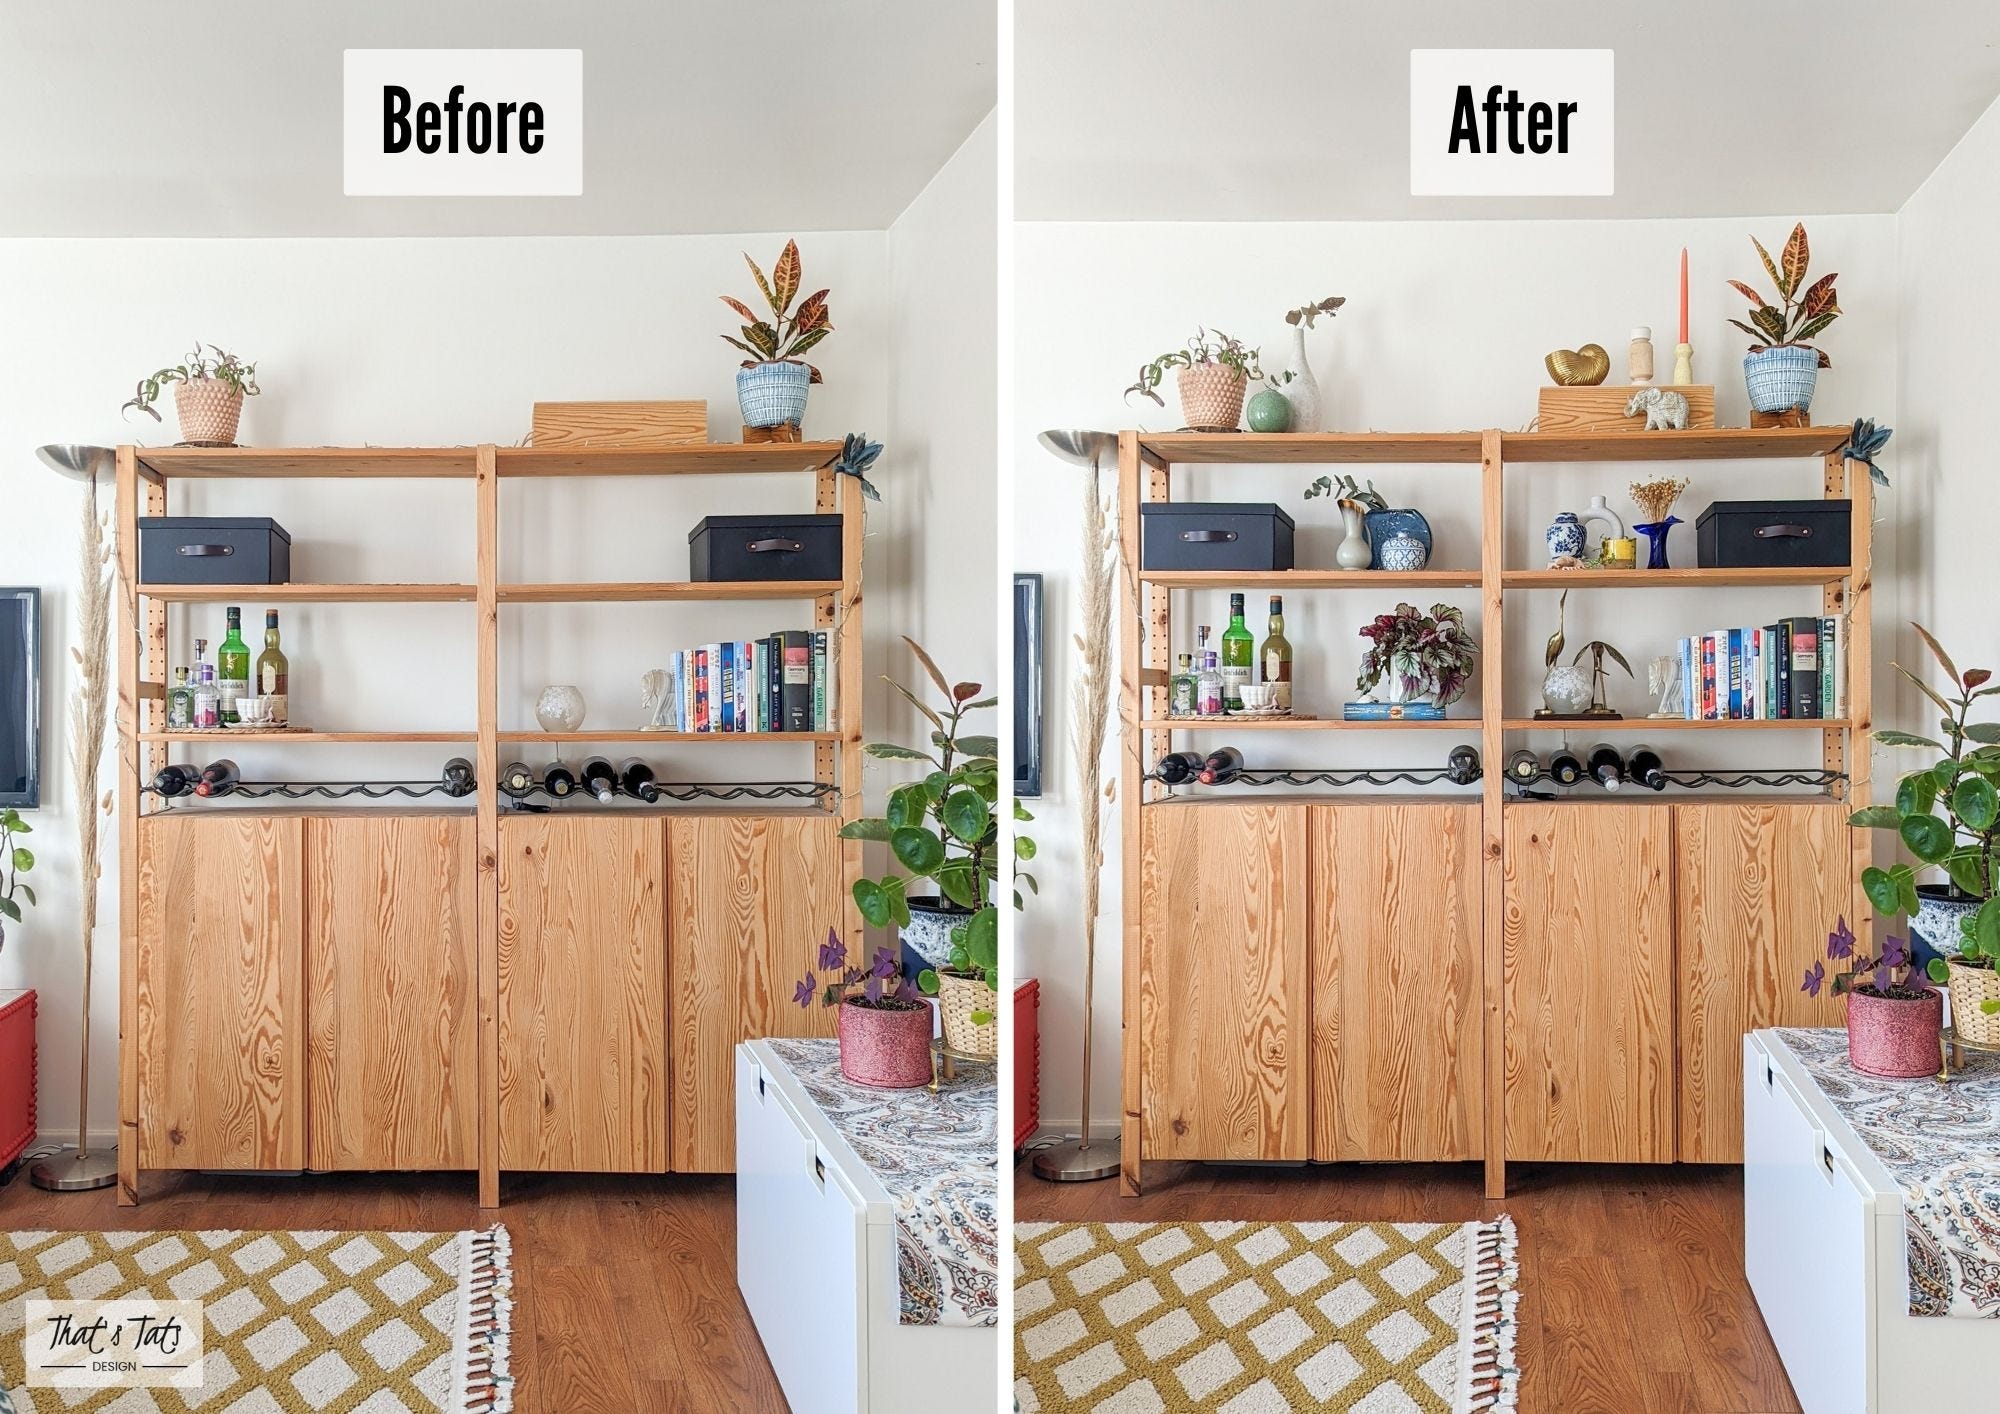
Where I would usually only shuffle things around and add items here and there throughout the year, in spring, I do completely clear the shelves to give everything a thorough clean in the spirit of some traditional spring cleaning. From then, I start by putting back my usual base, a structure that always stays the same, literally from day one when styling the shelves for the first time.
In my case, the consistent base of my IVAR shelves since setting them up years ago in the London house includes two storage boxes (1) placed on the upper shelf, towards the outer corner of the unit on either side. Given the dark colour and size of the boxes, this achieves visual balance, and helps the eye to naturally recognise the endpoints of the shelves.
This is followed by a couple of bigger items (2), placed on the very top shelf, again towards the outer corners to reinforce the outer endpoints of the shelves and simultaneously add visual height to this moderately sized unit. The items here would usually be plants to add softness in contrast to the storage boxes, and would also be of different heights to add that visual interest and a more natural, less structured, feel.
To finish off the base, I would usually fill the natural empty space left on the lower shelves with a collection of my books on one end, and my version of a little bar on the other (3). This is mainly so these everyday items are placed on an easily accessible height, as practicality is as important as visual balance when it comes to styling your shelves.
The vignettes
A vignette in interior design is a small intentional arrangement of decorative objects that adds personality and visual interest to a space such as a shelf. With the base done, I start adding these little arrangements to the spaces left empty on the shelves (4). This is where the restyling opportunity comes in, as these are the little vignettes I keep changing and adding to slowly over time, every time I feel the need for a little change. This is also where I let my creativity and the process of creation free rein. In this IVAR example, I mixed sea and spring themed items together, given it was indeed also spring at the time and I just freshly moved a step closer to the coast. So the items incorporated a variation of blues, yellows, and pastel greens, with a touch of white to add a neutral, providing some balance.
The relaxed, lived-in look
Now how can that be achieved? First and foremost of course with time, by adding little memories and items you love as you acquire them. But even so, I always follow very simple techniques, or guidelines if you like, when curating items into vignettes. These help me add visual interest, make the display feel less static, and take the eye on a more natural journey through the shelves. Overall, I'm adding lots of variation, which eventually results in a more relaxed, lived-in look, rather than shelves which feel purposefully styled.
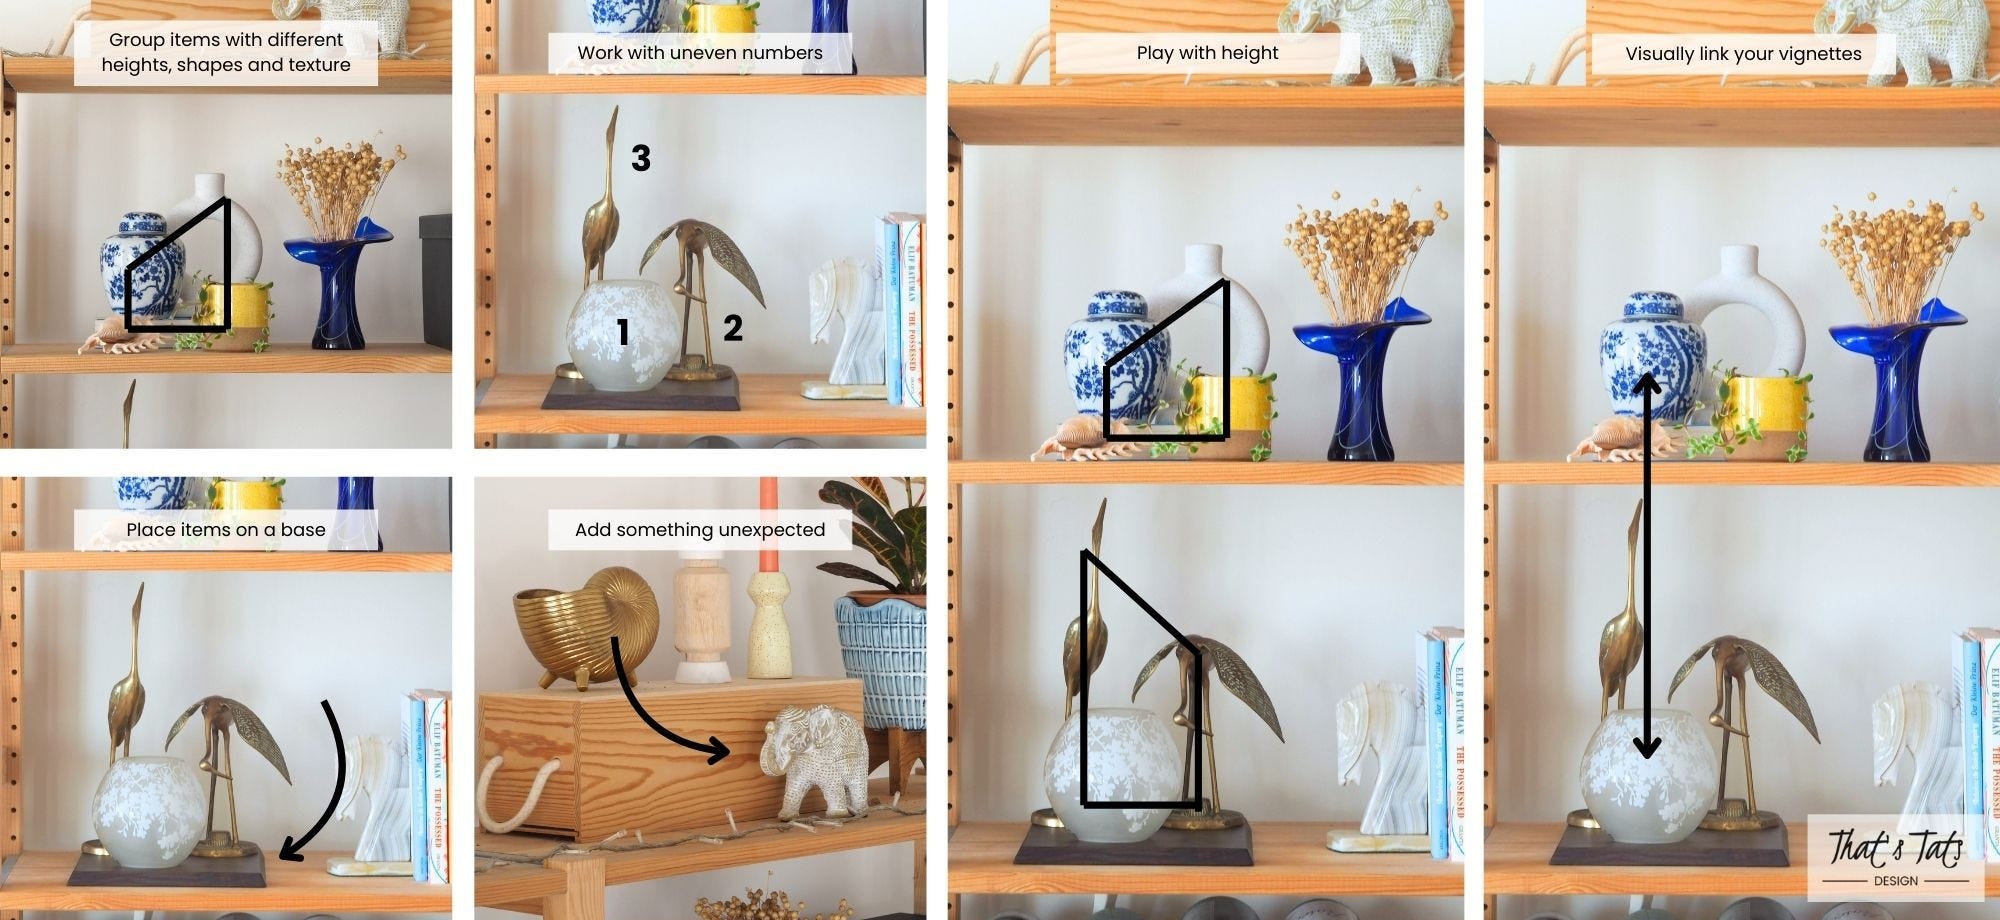
Group items with different heights, shapes and texture to add interest. I'd place that imperfect shell I found next to the beautifully crafted vase I discovered in a charity shop.
Work with uneven numbers, which is said to be more pleasing to the eye. I love to group three, five, or even more items together. Whatever feels right.
Place items on a base to visually define the group. I use trays or placemats in various textures, and even books. The latter will also add extra height where this is needed.
Play with height not just within a single group of items, but consider neighbouring vignettes. Where two arrangements are placed above or next to each other, I would place taller items at opposite ends and would make sure each group would vary in total height.
Visually link your vignettes by using items similar in shape to provide consistency. I would use a vase and a light similar in shape in two neighbouring vignettes for instance.
Add something unexpected to keep things interesting. This will absolutely develop over time, as a naturally evolving display will be a collection of many unexpected items, such as my little elephant here I picked up on one of my trips.
And that's it, hopefully you'll find this helpful should you ever want to bring new energy into your home, and more specifically your shelves. I am always intrigued to know what your experience is, and if you've got any styling tips you'd like to share, I'd love to know about those too! Feel free to comment below or send me a private message if you prefer.
I read, respond to, and hugely appreciate every comment, like, and share/restack. I absolutely love chatting to you, and not only does your feedback on any of my articles make my day, it also helps me make future articles even more helpful. As a bonus, you make an enormous difference to the articles being read by as many people as possible. So I highly appreciate you being here and your support.

You may also be interested in
Simple kitchen organisation ideas

If you’ve been here a while, you will know kitchens and bathrooms are my absolute favourite rooms to make over. They both provide a unique challenge when it comes to organisation and making a space work. In the average UK home these are usually relatively compact rooms, so they need to work extra hard. Quite often, kitchens especially are also inherited…
House to home without renovating

It is very rare that a new house, whether rented or owned, is feeling like your home when first moving in. There is a small chance that you may get lucky and find a home that already has your style, the wall colours are exactly what you like, the floors are what you would have chosen, and so on. I have not yet come across this home. But then it is also …
Handy kitchen design tips less frequently talked about

Given I am knee-deep in making over my kitchen (catch-up with the progress here) and given that I am not yet able to share the final result, because as always things take far longer than anticipated and, as is typical for me, I am of course adding little design changes as I go, but I thought I’d still stay on topic for this month’s blog and provide you …